Table of Contents
17.10. Importing regions
Regions are geographic boundaries, currently used in mSupply to help in displaying data on maps. At the moment they are only used in certain customisations but more use of them will follow as development progresses.
Import spreadsheet format
The first row of the spreadsheet is for the column headers and is not imported.
There must be 3 columns in the spreadsheet in the order shown in the following table:
| Column number | Column letter | Field | Description |
|---|---|---|---|
| 1 | A | Region name | Mandatory. 255 alphanumeric characters. The name of the region |
| 2 | B | Geometry | Optional. Lots of alphanumeric characters. The JSON geometry definition of the region. If it is entered then it must be valid according to the geoJSON FeatureCollection schema. |
| 3 | C | Parent | Optional. 255 alphanumeric characters. The name of this region's parent region. |
Here is an example spreadsheet you can use: region_import_blank_template.xlsx
Doing the import
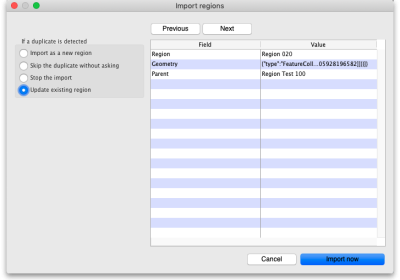
Choose File > Import > Import regions from the menus and you will be asked to select the import file from a file window. After you have selected the file (if it is valid) you will be shown this window:
mSupply uses the Region field to determine whether the region being imported is a duplicate; a region with the name as one already in the database is determined to be a duplicate. In the If a duplicate is detected section you tell mSupply what to do if it encounters a duplicate region during the import:
- Import as a new region: this option will import the duplicate as a new region
- Skip the duplicate without asking: the duplicate will not be imported and that row of the spreadsheet will be ignored
- Stop the import: as soon as a duplicate is encountered, the import will stop and all regions imported so far will be removed so that nothing is imported.
- Update existing region: the region that already exists with the name in the database will be updated with the information contained in the spreadsheet row. A new region will not be created.
The Value column shows the values mSupply has found in the cells for that row of the spreadsheet. You can move through the rows of the spreadsheet using the Previous and Next buttons. If you try to go beyond the first or last row of the spreadsheet mSupply will let you know.
You can carry out the import by clicking on the Import now button or cancel it by clicking on the Cancel button.
During the import:
- if the row has no region name it will be skipped
- if the row has an empty Geometry field, it will be imported with no geometry
- if the row has content in the Geometry field that does not match the geoJSON FeatureCollection schema it will be skipped
- if the parent region does not exist or is empty the region will be imported with no parent
When the import has finished you will be shown a message telling you how many assets were imported and how many rows of the spreadsheet were skipped.
| Previous: 17.09. Importing assets | | Next: 17.11. Importing requisitions |
