Table of Contents

Training Handout: Stocktakes
4.17. Stocktakes
General
There are four main types of stocktakes:
- Initial stocktake: The stocktake carried out when initially deploying mSupply at a site. This is the most difficult stocktake as it is not only the biggest stocktake you will ever carry out in the store, it will also be one of the first things you ever do in mSupply, so you are still learning the system!
- Partial stocktake: A partial stocktake means counting only a part of your stock. This may be a good way of splitting up counting all your stock, part of a system for counting all your stock in sections over a longer period of time or carrying out smaller periodic checks. You may select the stock to go in a stocktake by different locations, stock groups, types of items etc.
- Full stocktake: All items are counted at one time.
- Phased stocktakes: Items are counted in phases. See the full details on the 4.18. Phased stocktakes page.
A user can only create a stocktake or edit the lines on a stocktake if they have the appropriate permissions. See the 25.15. Managing users section for details.
Closing the store
Traditionally, during a full stocktake, the store is closed, and no transactions may take place until the exercise is completed.
The inconvenience caused by closure of the store varies from minor to significant. The benefit of using mSupply's stocktake module, while requiring that the store is closed while the physical stock check is in progress, is that the store may be opened immediately after the physical count is completed. Entry of the adjusted figures into mSupply® may be made at any convenient time over the next few days. While normal operation can occur immediately after the stocktake, issuance will be affected by any discrepancies discovered during the stocktake, so it is still preferable to finalise the stocktake a.s.a.p.
It is recommended to Create inventory adjustments from the stocktake as soon as possible after the physical count.
Confirm Customer Invoices
mSupply will not allow stock that is on a Customer Invoice with status of new (nw) or suggested (sg) to be taken out of stock by any other transaction process, including an inventory adjustment flowing from a stocktake - refer Creating inventory adjustments.
Before starting a stocktake, it is HIGHLY RECOMMENDED to process (take the stock off the shelves) and confirm any customer invoices with a status of new (nw) or suggested (sg) - please see Issuing Goods to a Customer (Customer Invoices), Confirming an invoice for details on how to do that.
This is so important that mSupply will show you a warning message when you try to create a new stocktake if it detects any customer invoices with suggested (sg) status. Please read and heed the warning and take suitable action.
Displaying stocktakes already performed
Select Show Stocktakes… from the Items menu to display any stocktakes already created or performed. This displays the following screen:

The Show: filter allows you to choose which stocktakes are displayed in the list. Options are:
- All: shows all stocktakes in the current store with any status for all time. Could be many of them!
- Current: selected by default when the window is displayed and shows all 'suggested' stocktakes (status = sg). These are stocktakes which have not yet been processed into inventory adjustments (finalised; status = fn)
- This year: shows all stocktakes of any status that have been created in the current year.
- Last year: shows all stocktakes of any status that were created in the year before the current one.
There will be an additional Program column in the table if you have program based master lists created (see 4.05. Programs) so that you can easily see if any of your stocktakes are program based.
Buttons on the Stocktake list window
New stock take
A New stock take is the normal way that you would create a stocktake, described in more detail on the rest of this page.
New blank stock take
A New blank stock take This would be used only if you are going to use the stocktake process to add new stock, that is stock that you are sure is not already recorded as in your store.
Delete stock take
Delete stock take allows you to delete stocktakes that have not been processed (finalised) into inventory adjustments.
There is little point in keeping old stocktakes with status = “sg”, especially if you are about to create a new stocktake containing the same items. Indeed, it can be quite dangerous to leave old stocktakes with status = “sg” in your system. If time has passed since the stocktake was created, then the snapshot and actual quantities are almost certainly incorrect. For good housekeeping reasons, it is good practice to delete old “suggested” stocktakes (status = “sg”).
Preparing for the stocktake
Prior to conducting anything but the most trivial partial stocktake, it is highly recommended to confirm or delete all customer invoices with status = sg.
It is also recommended to delete any 'Current' stocktakes (status = sg) in case they are accidentally finalised. If your store has fallen into significant disuse then this could be a daunting exercise. The mSupply Foundation has developed some code that deletes all customer invoices with status = sg and all 'Current' stocktakes (status = sg).
This is clearly a blunt instrument and should only be used with the greatest caution (the support team will guide you!). If you are interested in taking this risk, please contact support@msupply.foundation and reference Delete "sg" and "new" customer invoices and unfinalised stocktakes in the current store.
Creating a new stocktake
After viewing the current stocktakes, click on the New stock take button, and the following window will appear:

You can produce a stocktake for all items in your store by clicking OK without entering any filtering criteria. However, it will often be helpful to filter the stock that will be included in a number of ways as discussed below.
Filtering the stock to be included
You can filter by:
- Item properties Item name, code etc. as shown in this screenshot:

- Master list If you organise your items using master lists this can be a very powerful way of including items on particular master lists only in a stocktake e.g. for programmes
- Donor This filter is only displayed if the donor tracking preference is turned on (see Using the donor module)
- Locations. This is recommended when you are doing a full stocktake of a large warehouse where you can have several stocktake teams working simultaneously - see the Filtering by location section below.
- Expiry date. Search for items whose expiry is before a particular date. This allows you to easily remove all expired items from stock.
- Randomly selected. Select a number of items randomly chosen by mSupply. This is handy for the purposes of doing an audit.

1. Stock belonging to items that are invisible will always be added to a stocktake if the filter matches the item or stock. No stock can be hidden in mSupply!
2. Whatever filters you use, ad-hoc or non-stock items will never be included in a stocktake
Filtering the stock by expiry
You can carry out a stock take based on expiry dates for your stock. This is useful to review and remove expired stock from your inventory.

Filtering by location
Filtering by location is an especially useful way of breaking up a large stocktake in to a series of smaller stocktakes. This also allows different teams to undertake different smaller stocktakes simultaneously.
Of course, it is not possible to filter by stock locations if locations have not been defined! Also, a stock location based stocktake will only include stock lines that have actually been placed in to locations 
- The “Shelf location” in the top left Item properties drop-down list is the default shelf location of the item, which is where stock of a particular item might usually stored. This is not a recommended way of organising a warehouse, and is included here only due to customer request.
- To filter the stock take by shelf location to include what stock is actually stored there (according to mSupply records!), use the Stock location filter.
In this example, the location filter has been set to equals (the default), and the entry in the box has been typed in as A. Only stock in shelf locations called A will be included in the stocktake.

Preparing the stocktake
The stocktake list is produced:
- Sorted alphabetically, by name
- Omitting items whose stock level is zero
At this point the status of the stocktake is sg (suggested i.e. it is still being worked on and has not affected stock in any way yet):

Now fill in the information at the top of the stocktake:
- Description: A default description is filled in for you. We recommend that edit this to make it more meaningful while processing and for when you look back at your records later. This description is what is visible when you see a list of stocktakes. For example, you could add
Annual stocktakeorMonthly check. And / or, if you are filtering by anything such as stock location, it is worth including that here, e.g.M02.12.2A. - Comment: Put any other information you need to record about the stocktake in here.
- Stock take date: This is the date you performed the stocktake and is set to the date the stocktake was created by default. Users will only be able to edit this if they have the Can edit stocktake dates permission set (see Managing users for more information). They will also be able to set the confirmation date of the inventory adjustments created from the stocktake when it has been finalised (but you can never change the date to before the Stock take date set in this field).
New line button: You can add new lines to the stocktake by clicking on this button (see the Adding items not in the stocktake section below)
Delete lines(s) button: Click on this to remove lines you have already selected in the list from the stocktake (you can use the usual Shift and Ctrl/Cmd clicking to select lines as usual).
Just a quick word about the read-only (non-editable) information displayed at the top of the stocktake:
- Stock take key: The stock take number. This is an automatically generated number which increments by 1 for each new stocktake. It is unique within a store only so it is possible for stocktakes from different stores to have the same number.
- Stock take entered date: The date the stocktake was created in mSupply.
- Stock take status: The current status is the stocktake:
- sg = suggested, the stocktake is still being worked on and is editable - new lines can be added or deleted and values can be edited etc.
- fn = finalised, the stocktake is complete and cannot be edited (inventory adjustments have been created form it)
And a quick word about the columns in the table: if adjustment reasons are being used or any of the custom stock fields in File>Preferences>Stock tab then columns for those will also be displayed in this table.
The stocktake is a list of your stock, providing you with a 'snapshot' of your stock at a point in time. From this, mSupply enables you to create printed lists of your stock items from which you and your staff can do the physical stocktake.
Example for a large warehouse
A large warehouse can have thousands of locations. A full stocktake would run to tens or even hundreds of pages. This is a challenge to manage. In cases like this, it is recommended to create stocktakes broken down according to locations.
Remember to confirm any outstanding CIs with status = sg before you start, and don't let any of your staff create any new customer invoices until the stocktake is over, and preferably, all inventory adjustments have been processed.!
In large warehouses, stock locations are often labeled in a systematic pattern something like this:
A##.$$.%%, where,
- A = 'Room', for example,
M→ Main store room - ## = aisle numbers,
01,02,03, etc. - $$ = bay number,
01,02,03, etc. noting that a common convention is for even numbered aisles to have only even numbered bays, and similarly, odd numbered aisles to have only odd numbered bays. - %% = shelf 'space',
1A,1B,1C, etc.
For example, M20.02.4B would be the location name for the location in the Main store room, Aisle 20, Bay 02, Shelf 4B
| To create stocktakes for each | Filter Stock location by |
|---|---|
| Aisle | Starts with M01, Starts with M02, Starts with M03, etc. |
| Bay | Starts with M01.01, Starts with M01.03, Starts with M01.05, etc. |
| Shelf | Starts with M01.01.1A, Starts with M01.01.1B, Starts with M01.01.2A, Starts with M01.01.2B, etc. |
To speed things up and ensure that you have described your stocktakes correctly according to the stock locations filter, you can copy the text of your filter (before clicking OK) and then paste it at the end of the stocktake description. After clicking on the Stocktakes button on the Items navigator this can be done entirely with the keyboard!  For example, if you want to create a stocktake for all location in Bay M01.01:
Firstly, click on the Stocktakes button on the Items navigator
The Stocktake list… window appears. Then:
- Type Ctrl+N to start a New stock take
- Type Tab Tab Tab Tab Tab Tab Tab Tab (Tab x 8) to get to the Stock location equals pull-down button
- Type Down-arrow to get to the starts with option
- Type Tab to move the focus to the text entry field
- Type
M01.01 - Type Ctrl+A to select all text
- Type Ctrl+C to copy the selection to the clipboard
- Type Enter (same as clicking OK button).
The Stock take sheet… window appears. - Type Tab to highlight all text in the Description field
- Type End to move the cursor to the end of the existing text (If you are on a laptop where the End key is hard to find, the Right arrow (→) key will also work here)
- Type
- Type Ctrl+V (Pastes the clipboard)
- Type Enter (same as clicking OK & Next button).
The Stocktake list… window appears.
Repeat the above steps for each stocktake.
Example for fast moving items using a master list
It is often useful to regularly do a stocktake of fast moving items. A convenient way to do this is to create a master list of fast moving items called, say, Fast movers.
To create a stocktake containing just the items on this Fast movers master list:
- Confirm any outstanding CIs with status = sg
- Item > Stocktakes > New stock take
- Select the Fast movers option from the is on Master List pull-down
- Click OK

Print sheets to do the stocktake
Before printing you need to ensure that the order in which items are displayed is appropriate. By default the list is alphabetical, but for stocktaking purposes, it may be more appropriate to sort the list by location and then by item name; this is achieved by clicking on the Order by button and choosing Sort by location then item name

If you want another sort order, click a column heading for a simple sort, or choose the Custom sort option from the Order by button.
You can filter a stock list by entering the item name - or the first few characters of the name - or the item code in the box Item name/code in the top right area of the window, then clicking the Find button
Clicking on the Print icon displays the available options:

- General: contains several options. Click on it and you are presented with a further window:
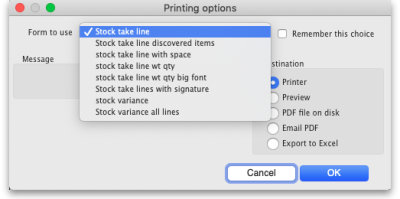 The Form to use drop down list contains these options:
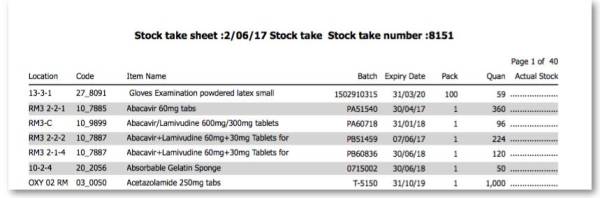
- Stock take line - prints out all the lines on the stocktake, including their quantity, with a space to write the actual counted quantity. It looks like this:
- Stock take line discovered items - prints out a sheet with all the headers but containing only blank rows. Perfect for writing down the details of new batches you discover during the stocktake. Looks like this:

- Stock take line with space - is the same as the Stock take line printout but with no quantity and 5 lines of space under each line. Useful if you know there's a lot of stock in the warehouse that isn't in mSupply.
- Stock take line wt quantity - is the same as Stock take line but with no quantity. This is the one we recommend you normally use to give to the people carrying out the physical count. This helps to ensure that the quantity of stock on the shelves is actually counted and not just guessed!
- Stock take line wt quantity big font - is the same as the one above but printed in landscape with a bigger font. This is particularly helpful in warehouses with poor lighting (powercuts, etc.
 )
) - Stock take lines by location - prints the lines for each location on a separate page.
- Stock take lines with signature - same as Stock take line wt quantity but the stocktake signature entered in the printing preferences is printed at the end.
- Stock variance - this shows the items that were adjusted after the stocktake was finalised. Similar to the Inventory adjustments option below but a slightly different format.
- Inventory adjustments: prints information about all the items that had their quantities adjusted because of the stocktake after the stocktake has been finalised (see finalise section below).
- Inventory adjustments-all items: prints information about inventory adjustments made after finalisation but includes all items, not just those which have had their quantities adjusted.


There is, of course, a further option - you may provide the staff performing the stocktake with blank sheets, requiring them to list the items, batches, expiry dates, locations, pack sizes and quantities manually. We don't recommend you use this option unless your printer is broken
Perform the stocktake
Allocate staff to perform the stocktake, instruct them in the process you wish to follow, and issue the sheets to them.
For a stocktake involving several staff, it is recommended to require the staff members to write their name and date on each stocktake sheet. This is especially helpful when trying to interpret difficult handwriting 
Enter quantities into the system
Once the physical stocktake has been completed, you are ready to make entries to record any differences in stock levels into the system. Remember that any item which mSupply calculates as having zero stock will not appear on the stocktake sheet.
Filtering the list by item name or code
To help quickly find any item you want to make any adjustments to, you can enter the first few characters of its name or its code in the Search by item name and code field. The displayed list of items will be changed each time you enter a character to show only the items whose name or code matches what you have entered so far. To return to the full list just delete everything in this field.
Making adjustments
If there are no differences between what was physically seen in the warehouse and what is shown in the stocktake for a particular line then you can leave it alone - no changes are necessary.
If the only difference between what is in mSupply and what was physically seen in the warehouse is the number of packs (the figure in Enter Quantity column) then click on the figure in the Enter Quantity column and edit it to match what was physically counted in the warehouse.
You can press the Tab key on the keyboard to quickly move through the editable fields on one row and then then to the next row to edit (Shift+Tab to go to the previous editable field).
If there is more of a discrepancy between what mSupply says you have in stock and what was physically seen in the warehouse then double-click on the line. The line edit window will open:

You can now edit more details:
- Stock take qty: the number of packs you counted in the warehouse
- Batch: the batch or lot number of the stock
- Expiry date: the date the stock will expire
- Location: where the stock is located in the warehouse (type the first few letters of the location's code and press the Tab key on the keyboard to select the right location from a matching list)
- Volume per pack: the volume of one pack (of the Pack size field) of the stock in m3. You can enter in litres or ml by typing
lormlafter the figure you enter. - Weight per pack: the weight of one pack of the item (of the Pack size field) in kg.
- Cost price: the price one pack of this line of stock cost you. Check the 12 month average checkbox if you want mSupply to calculate a weighted average pack price based on the supplies of this item you have received in the last 12 months.
- Sell price: the price you sell a pack of this line of stock for.
- Hold: do not issue: if checked then this will put the stock line on hold so that it cannot be issued in customer invoices. WARNING: this stockline will be put on hold immediately after the OK or OK & Next buttons are clicked if this checkbox is checked, the change will not wait until the stocktake is finalised.
- Comment: anything you want to remember that was notable about this line during the stocktake.
- Donor: the donor of this line of stock (type the first few letters of the donor's code and press the Tab key on the keyboard to select the right location from a matching list). Will only be available if the Allow tracking of received stock by donor preference is turned on (see the Invoice preferences page for details).
- Manufacturer: If the Able to enter manufacturer when receiving, ordering or quoting for items store preference is turned on then this field will show and you can edit the manufacturer of the stock. Type the first few characters of the manufacturer's name and press the Tab key on the keyboard to select the right manufacturer from a list.
- Custom stock fields 1-8: If any of these fields are turned on in the File>Preferences>Stock tab then they will show on this window and you can edit their values as appropriate.
Notice that you cannot change the Pack size value. If you want to do that then you must set the Stock take qty for this line to 0 and add a new line with the correct pack size (see the Adding items not in the stocktake list section below for details).
Adding items not in the stocktake list
In the event of an item being physically present in the warehouse, but not on the list then it needs to be added to the stocktake in mSupply:
- Click the New line button and this window will appear:
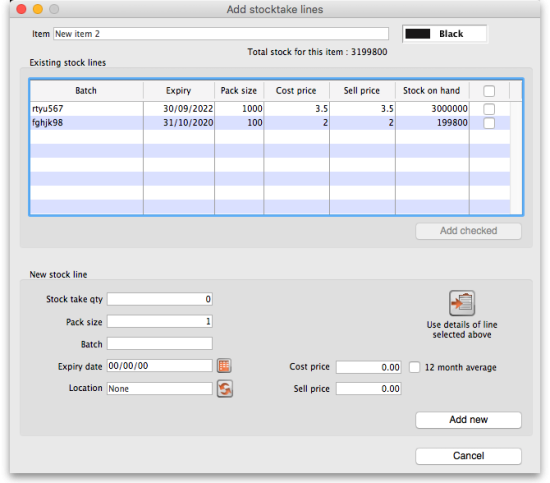
- If you want to add a line of stock that already exists in mSupply then, in the Existing stock lines table at the top, check the checkbox for the line you want to add and then click on the Add selected button. You can add more than one line if you wish - just check all the lines you want to add. If you check the checkbox in the header of the checkbox column this will check all the boxes for you (and uncheck them again if you uncheck it).
- If you want to add a new line of stock that doesn't exist in mSupply then enter its details in the New stock line section at the bottom and click on the Add new button to add it.
- Stock take qty: the number of packs you found in the warehouse.
- Pack size: the number of items in each pack that you found in the warehouse.
- Batch: the batch number of the item you found.
- Expiry date: the expiry date of the item you found (click on the calendar icon to select it or enter it manually).
- Location: the shelf location in the warehouse where you found the item (if you don't know the exact location then type the first few characters of the location label, press the Tab key on the keyboard and select the location from the list that appears).
- Donor: the donor of this line of stock (type the first few letters of the donor's code and press the Tab key on the keyboard to select the right location from a matching list). Will only be available if the Allow tracking of received stock by donor preference is turned on (see the Invoice preferences page for details).
- Manufacturer: If the Able to enter manufacturer when receiving, ordering or quoting for items store preference is turned on then this field will show and you can edit the manufacturer of the stock. Type the first few characters of the manufacturer's name and press the Tab key on the keyboard to select the right manufacturer from a list.
- Custom stock fields 1-8: If any of these fields are turned on in the File>Preferences>Stock tab then they will show on this window and you can edit their values as appropriate.
- Volume per pack: the volume of one pack (of the Pack size field) of the stock in m3. You can enter in litres or ml by typing
lormlafter the figure you enter. - Weight per pack: the weight of one pack of the item (of the Pack size field) in kg.
- Cost price: if you know it, enter it in the currency you are using in your datafile. If you don't know it, you could check the 12 month average checkbox and mSupply will enter a weighted average price of all the stock of this item you received over the last 12 months.
- Sell price: if you know it, enter it in the currency you are using in your datafile.
- Hold: do not issue: if checked then this will put the stock line on hold so that it cannot be issued in customer invoices. WARNING: this stockline will be put on hold immediately if this checkbox is checked when the OK or OK & Next buttons are clicked, the change will not wait until the stocktake is finalised.
- Use details of line selected above button: this is a shortcut to save typing values in all the fields in this section. If the details are similar to a stock line that is shown in the Existing stock lines table above then click on the line in the table to select it then click on this button. mSupply will copy the details of thew line into the fields in this section and you can then edit the ones that aren't quite right.
- You can also select a colour for the line in the stock take using the colour picker in the top right hand corner (set to black by default, as shown in the screenshot).

After clicking on the Add new button you are returned to the Stocktake sheet window, where the new line entered will now appear in the colour selected; note that the new line(s) appear at the bottom of the stocktake and they have a value of zero in the Snapshot column.
- If you add a new line to the stocktake that has the same details (pack size, batch, expiry, location, cost and sell price) as one already on the stocktake, you will be asked to confirm if you really want to add the line.
- All details of a new line added may be edited, but only the quantity or the location of existing lines on the sheet may be edited; this is performed by double clicking on the row you wish to edit.
- The Delete item button will only work to delete lines which you have added yourself (i.e. lines with a snapshot quantity of zero).
When searching for items and stock to add to a stocktake, stock that belongs to items that are invisible in the current store will always be available to be added. You will not be able to add new stock lines for items that are invisible in your store but you will be able to add existing stock for invisible items - it will show up in searches, just as though the item was visible in your store.
No stock can be hidden in mSupply!
Adjustment reasons
If you have created at least one Positive inventory adjustment reason and one Negative inventory adjustment reason in the system (see the 16.10. Options (standard reasons) section for details) and at least one of each type is active, then an additional Adjustment reason column will be displayed in the stocktake window:

The column is read only but, if you edit the number in the Enter Quantity column then the line edit window will be opened and you must select an Adjustment reason (one of those you set up in the preferences - a Positive adjustment reason if you have increased the quantity compared to the snapshot value, a Negative adjustment reason if you have reduced the value):

When you finalise the stocktake and create the inventory adjustments (see below), the individual lines of the inventory adjustments will be given the same adjustment reasons you set for them in the stocktake.
Create inventory adjustments
When all necessary adjustments have been entered, you are ready to create the inventory adjustments.
Creating inventory adjustments (finalising the stocktake) is not reversible, so you have to be quite certain you've finished making all the changes you want to the stocktake before you do it.
Inventory adjustment categories
After you click on the Create inventory adjustments button, the following window will appear to ask you to confirm this is what you want to do:

Before you click on the OK button to confirm, you can select a transaction category to give to the inventory adjustments when they are created by clicking on the drop down list (these can be useful when it comes to reporting later). This drop down list is populated with all the transaction categories in your datafile that have a type of inventory adjustment (see section 22.07. Transaction categories for information on creating transaction categories).
What if there is insufficient stock to adjust?
If an item has limited stock and that stock is allocated to an invoice during stocktake, when you try to adjust the stock the following window will display giving you two options to choose from:
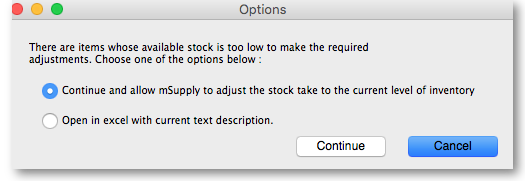
For the excel option a spreadsheet will open allowing you to analyse the invoices to which the stock is allocated. The highest invoice number is likely to be the one entered during stocktake.

Of course, closing off transactions until a stocktake is complete and avoiding these kinds of issues is by far the best practice.
If you have the Can edit stocktake dates permission (see Managing users) then you will be able to edit the confirmation dates of the inventory adjustments to match the stock take date.
Any changes to lines in a stocktake that don't include a change in quantity (e.g. a change in batch, expiry date or sell price only) will also result in stock in the system being updated when you click on the Create inventory adjustments button but it will not result in any lines being added to an inventory adjustment. You can see the changes in the system by viewing the details of the individual stock lines and all such changes are logged, on the stocktake (see the log tab when viewing the stocktake or 25.19. The system log) and the stock line's log itself (see Stock line details window).
Viewing inventory adjustments
Once inventory adjustments have been created, the status of the stocktake changes from suggested (sg), to finalised (fn). You will now observe a change in the buttons appearing on the Stocktake sheet:
- in the upper area, only the Print button is present
- while at the bottom two new buttons are present; Show added adjustments and Show reduced adjustments.

- Click on either button to display the related inventory adjustment transaction.
If the inventory adjustment quantities look wrong
It is possible for the stock reduction inventory adjustments created by your stocktake to have smaller quantities on them that you expect. They may even be zero like the example in this screenshot (and you know there should definitely be a reduction in stock because the counted quantity was less than the snapshot value in the stocktake):

The quantity might not be zero but still less than the snapshot minus the counted quantity specified in the stocktake.
This scenario is because stock was found on new or suggested status customer invoices. This stock is reserved for customers by mSupply but not removed form your total stock (see 8.01. Issuing goods to a customer (customer invoices)) and must be included in your count - if you don't include it in your count, then mSupply will try to remove it from your stock again when you finalise the stocktake. And if there's not enough stock, mSupply has to reduce the quantity on the reduction inventory adjustment. Which is the discrepancy you see when you look at the stock reduction inventory adjustment created by mSupply when you finalise the stocktake.
To avoid this scenario follow the golden stocktake rule:
Review and CONFIRM all Suggested (sg) or New (nw) status invoices before creating your stocktake.
If you must leave some customer invoices unconfirmed before finalising the stocktake then include the stock on them in your stocktake count. If you confirm the invoices after creating the stocktake but before finalising it you must reduce the count on your stocktake by the total amount of that stock line on the invoices you confirmed. As you can see, it can be complicated so it's much better to follow the golden rule. Trust us!
To understand further see the 28.04. How to remove stock lines that have ‘0’ available page.
Print the report
Clicking on the Print button and clicking on Inventory adjustments will print this information:

In this example, three adjustments have been made:
- Magnesium carbonate: present at the physical check but not on the sheet, has been added
- Peppermint oil has had its stock increased
- Sodium bicarbonate has been reduced in stock
Items that weren't changed don't show in the report - if you want to see all items, including those that weren't changed then click on the Print button and select the Inventory adjustments - all item option.
Some points to note:
- When you have created the stocktake sheet, it's like `taking a snapshot'; the physical stock at that location should not be removed until the stocktake has been performed; nor should stock be added.
- New transactions can however, be entered into the system.
- the Log tab on the Stocktake sheet will list any anomalies. An anomaly may occur if a transaction has been entered after the stocktake that issued more stock than you physically counted. Obviously someone has made a mistake in such a situation.
- There is on the stocktake window (lower left corner) a checkbox Locked , which, if checked, will allow neither deletion of the stocktake nor any changes to be made to it.

- Ok and Next - if you have no more stocktakes to add, click the 'OK' button, to add only the stocktake just completed. To add a further stocktake, click the 'OK & Next' button and proceed to add your next stocktake.

| Previous: 4.16. Splitting a stock line | | Next: 4.18. Phased stocktakes |