Table of Contents

Training Handout: Issuing Stock, Customer Invoice
8.01. Issuing goods to a customer (customer invoices)
Creating a new Customer Invoice
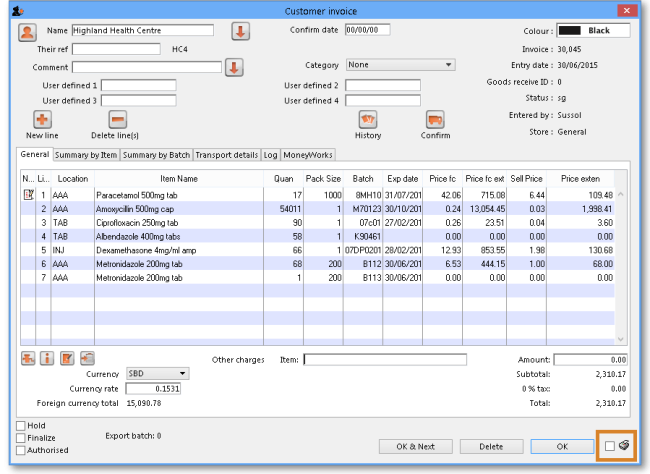
Choose Customer > New invoice from the menus. A window like this will open:

Variations you might see in this window
- A user defined field (the Truck No field) is displayed in the above screenshot. To show or hide user defined fields go to File> Preferences> Invoices 2 (see the 16.03. Invoice preferences page for details).
- If the Able to specify VVM status when receiving items store preference is turned on (see the 26.07. Virtual stores page for details) then an additional Doses column will be displayed in the table. If the item is a vaccine then the column will show the number of doses the line represents. If it is not a vaccine then it will show N/A.
- The Confirm date can be made editable if the Allow confirm date to be edited on invoices preference is turned on. See the 15.03. Invoice preferences page for details.
Information to enter in the main window
Name
Type as much of a customer name here as you know and then press Tab. If there is only one name that matches your choice, it will be entered automatically for you, otherwise you will be presented with a list of available choices. Once you have entered a valid name, the New line button will be enabled. If you can not find the name you are looking for, you can add a new name by clicking the person icon (![]() ) to the left of 'Name'.
) to the left of 'Name'.
By default, names with their code starting with a tilde (~) are not shown. This is a great way preventing a user selecting a name when it can't be deleted or hidden in a store - put a tilde character at the beginning of its code.
The downward pointing arrow to the right of the Name field takes you directly to the Edit Customer/Supplier window, giving access to all the information relating to the name entered
Their ref
Enter the customer's order number if there is one
Comment
Click on the downward pointing arrow to the right of the Comment field to display a window where any comment relating to this invoice can be noted.

Category
If you are using the category feature, and have defined them, the appropriate category is selected from the drop-down list.
User-defined transaction fields
If you are using the user-defined transaction fields, they will appear and can be filled in here. Should you wish to use them, they have to be activated in Preferences>Invoices 2, refer Show customer transaction fields.
Read-only information on the invoice
There is some information on the top of the invoice that is read-only and cannot be edited:
- Confirm date: The date the invoice was confirmed. “00/00/00” if the invoice has not been confirmed. Note: this date can be made editable if the Allow confirm date to be edited on invoices preference is turned on. See the 15.03. Invoice preferences page for details.
- Invoice: This is the invoice number. The number is automatically incremented and assigned when the invoice is first saved (which actually occurs when the first line is added to it) and is unique within a store. Note that customer invoices in different stores could have the same invoice number.
- Entry date: The date the invoice was created.
- Requisition: If the customer invoice is linked to a requisition (because it is supplying goods to a customer because of a requisition they sent to you or you created for them) then its number will appear here in blue, indicating that it is a link and, if clicked, will open the requisition. If the number is 0 this indicates that the customer invoice is not linked to a requisition.
- Status: The current status of the customer invoice:
nw= new (just created, can still be edited, stock not yet removed from mSupply but available stock reduced so reserved stock can't be assigned to another invoice)sg= suggested (has been opened since first creation, still editable, stock not yet removed from mSupply).cn= confirmed (stock has been removed from mSupply but invoice is still editable).fn= finalised (stock has been removed from mSupply and the invoice is no longer editable).In a multi-store system, a CI will not translate into a SI in the receiving store unless it is finalised. mSupply will warn you if the customer is another store in your system and you are trying to close a CI with status =
cn.
- Entered by: The user name of the user who created the customer invoice.
- Store: The name of the store the customer invoice belongs to.
Buttons at the top of the customer invoice window
At the top of the Customer invoice window, there are a series of buttons:

New line
Will add a line to the invoice. This command can be used on any invoice that is not finalised. Clicking the button will present you with the window for adding a line from stock. See the Adding lines to an invoice section below for more details. To select a line to edit, simply double-click on it. Note that new line and edit line are disabled on finalised invoices.
Delete line(s)
- Will delete any selected line(s).
- Selected line(s) will appear highlighted.
- Multiple selected lines do not need to be adjacent.
Once an invoice has been finalised, you can not delete an item line from it.
Backorders
This icon is displayed only if `We run a backorder system' is checked in the Preferences > invoices 2 options - refer We run a backorder system. Clicking this button shows you a list of items that are on backorder for the customer you have chosen. To view the backorder list of items, you must first confirm the transaction.

Refer to Issuing Goods - Managing Customer backorders for a full coverage of the backorder topic.
History
Clicking on this icon will display a record of all that this customer has purchased in the past. This may produce a very long list! The list appears in chronological order, but clicking on any of the column headers will sort the list according to that parameter.
Confirm
When this button is clicked, the status of the order changes from nw (new) or sg (suggested) to cn (confirmed).
If you have “confirm invoices automatically” set in the Preferences, the Confirm button will not be visible. The invoice will be confirmed as soon as you click on the OK button. Read below to see what confirmation does.
- The confirm button is only available for invoices with status
nw(new) orsg(suggested). - Confirming an invoice should be done when the goods have been removed from the shelves and have left the store or have been packed ready for dispatch). Most importantly, as far as mSupply is concerned, this stock is no longer in the store and a stocktake will not find it!
More detail around confirming a Customer Invoice:
- Each item line records two stock levels- the Tot in store is the total stock in the store. the Available amount is what can be issued on an invoice.
- For example:
- You have 10 bottles of Paediatric Paracetamol Elixir in stock.
- You get an order for 3 bottles from Fred, and create an invoice for Fred and set the Issued amount to 3. The Tot in store is still 10, but Available amount drops to 7 as these 3 bottles are 'reserved' for Fred and can't be issued to anybody else.
- You are about to dispatch the order. At this point you confirm the order. The Tot in store also drops to 7.
- In summary, the Confirm button does the following:
- Each line has its Tot in store reduced by the Issued amount on that line
- The Customer Invoice status changes to
cn
- If you are running a backorder system, confirming a Customer Invoices also deletes any placeholder lines (those with a batch entry of “none”) and adds them to that customer's backorder file.
Modifications may still be made to the invoice (and those changes therefore directly affect the stock in mSupply). See Confirming an invoice.
If you have the store preferences set to force customer invoice authorisation, you will not be able to confirm customer invoices until they have been authorised. See here for details.
If your system has multiple stores, you will not be able to transfer stock to a store if the item is not visible in the receiving store. There are many checks in mSupply to make sure that stock cannot be hidden in a store.
Buttons and checkboxes at the bottom of the Customer invoice window
At the bottom of the Customer invoice window, there are a series of controls.
Hold
Checking the Hold checkbox prevents the Customer Invoice from being confirmed or finalized.
Finalize
Checking the Finalize checkbox allows you to finalize an invoice when you click the OK button. Only users with Can finalize individual invoices checked in their user permissions can check this box. Other users will be warned if they try to turn it on, and the Finalize checkbox will automatically uncheck.
If the Finalize checkbox is checked and you click the Confirm button, the invoice will be confirmed as well as finalised when the OK button is clicked, so be very careful! A finalised invoice may be viewed and/or printed, but it can not be edited.
If the Finalize checkbox is checked but dimmed out, it means that File>Preferences>Invoices 2>Finalize customer invoices automatically is checked and all confirmed invoices will be finalised whether you like it or not!
Delete
The Delete button allows the deletion of an invoice. If the invoice has a status of 'nw' you can delete the invoice even if has lines added. If the status is 'cn' or 'sg' you will have to delete the lines manually first - refer Deleting line(s). When an invoice has been deleted the invoice number that it was assigned will be reused.
OK
The OK button saves the changes you have made and exits the window. You are given the opportunity to print if the Print checkbox is ticked.
PLEASE NOTE: Before the window is closed, a check is made that none of the stock being issued on the invoice was received before the invoice was confirmed. If this condition is encountered, an alert will inform you that you must choose another line of stock or change the confirmed date of the invoice. This condition is only possible if the Allow confirm date to be edited on invoices preference (see the 15.03. Invoice preferences page for details) is, or has been, turned on.
OK & Next
The OK & Next button does the same as the OK button but it then opens the next customer invoice in the list, if this one was opened from a list. If there is no next invoice, or you've reached the end of tha list then the window just closes, exactly the same as if the OK button had been clicked.
Printing the invoice
If the Print checkbox is ticked then print options will be presented when the OK or OK & Next buttons are clicked.
If the invoice status is 'nw' (new) or 'sg' (suggested), pick list options will be printable.
If the invoice status is 'cn' (confirmed) or 'fn' (finalized), invoice options will be printable.
If the option to turn on the print check box has been set under File>Preferences>OK and print, you can override the printing process by holding down the Shift key as you click OK, and no invoice will be printed.
Instead of an invoice, should you wish to print a pick list for an invoice whose status is 'cn' or 'fn', hold down the Alt key (Windows) or the Option key (Mac) while clicking OK.
Tabs in the customer invoice window
The three tabs allow the invoice to be viewed in three different formats, but note that the lower area of the window remains the same and is available for appropriate input in all views.
General tab
Once an invoice has been created, a detailed view of the items on it may be seen by selecting this tab; where the supply of a single item is made up of different batch numbers, they will be displayed as separate lines:

Note: Items that are marked as 'non-stock' items will be coloured blue. See more information here.
Buttons in the General tab
There are a row of small icon buttons at the bottom left of the window. Hovering the mouse over each button gives a description of what it does.

Process button (grinder icon)
Clicking this button shows a menu with the following choices:
1. Renumber lines: will re-assign line numbers to all lines on the invoice according to their current order (you can move lines around by dragging and dropping to a new position.
2. Issue stock for all placeholder lines: This option will go through each placeholder line on the invoice and issue stock to them by taking stock from stock lines in the order described in the Selecting from stock lines section below. This can be really helpful but, beware, there are good reasons why you might not want this to happen, including:
- Availability of sufficient stock of the line in question
- Pack sizes that fit with the quantity/pack on the placeholder line. mSupply will happily issue parts of a pack. In reality, you may wish to choose from a different stock line with different pack sizes!
- You might want to issue stock belonging to a particular program or donor.
Financial summary
Clicking this button shows you a summary of the cost and selling price information for the invoice.

If you check the Print as Pro-forma invoice checkbox in this window, rather than printing a pick slip, a pro-forma invoice will be printed, allowing you to give a paying client a form showing expected charges.
Transaction note
Allows you to make a note relating to this invoice.
Copy to clipboard
Copies the entire invoice to the clipboard.
Summary by item tab
The Summary by Item tab displays the items on the invoice, consolidating different batch numbers and displaying the total quantities for each item only; the invoice above appears in the following format when the Summary by Item tab is selected.

Summary by batch tab
The Summary by Batch tab displays the items differentiating between batches, and showing a breakdown where more than one batch has been supplied on the order. The above invoice appears in the following format when the Summary by Batch tab is selected; note that two different batches of metronidazole tablets were supplied.

Transport details tab
Selecting this tab displays the following window:
![]()
Here you can add information about the method of transportation and other related information. You can then report on performance of your transport operations in various ways using the Transport Report.
Order tracking data
The five date boxes enable you to track your order from it being generated (written) to the customer confirming receipt of it (actual arrival date):. The five date fields are:
- Order written date: The date the customer wrote the order (this will usually be on their requisition form).
- Order received date: The date the customer's order was received by you
- Order shipped date: The date the order left your store
- Expected arrival date: Given the shipping method you're using, when you expect the goods to arrive at the customer's premises.
- Actual arrival date: The date the goods reached the customer you are supplying. Obviously you will only know this if they report the information back to you (e.g. via SMS message)
If you use these date fields, it allows reporting using the Transaction Report using the report form Order Processing time. Sometimes it is necessary to edit these dates after finalisation of a customer invoice so there is a special permission for users to allow them to do this (on the User details page, Permissions 2 tab - see Managing users, the Permissions tabs for details.
- You can make the Order written date and Order received date fields compulsory in File > Preferences, Invoices 2 tab as explained in Invoices preferences.
- You can add a Shipped to contact name if you select Choose contact for transport details in File > Preferences, Invoices 2 tab as explained in Invoices preferences
Shipping method
The list of options in the Ship method drop down list is set by choosing Customer > Show shipping methods…, when you are shown a window with a list of existing shipping methods:

Plan carefully before creation of shipping methods. Once created, a shipping method can be edited, but it can't be deleted if even a single customer invoice is using it…
- To enter a new method, click the New button.
- To edit an existing method, double-click the item in the list and edit its details.
- To delete a method, click on it in the list to select it then click on the Delete button. You will not be able to delete a shipping method if it is being used by a customer invoice. Depending on the status of the CI, you may be able to change a shipping method

Responsible officer
The choice list for Responsible officers is a list of mSupply users for whom the “Can be responsible officer” check box has been checked. Choose File>Edit users…, then double-click a User Name to set up each user as a responsible officer (or remove them from the responsible officer list)
Box management and label printing
The Box Management feature is used to tell mSupply which items were put in which 'box' or container for transporting to your customer. This has a few advantages:
- You can print labels from mSupply to stick on each box (either from a label printer or a normal A4 paper printer - see the Printing an invoice: Picking slips and delivery notes section below for details).
- You can create (automatically or manually) weight and volume information which can be printed on the packing list or passed to your freight handlers.
- It tells the customer what's in each box to help their goods-inwards processing.
For full details about this feature see the 8.06. Box management page.
The Print labels button at the bottom of the page will enable you to print labels from a label printer to stick on the packaging. When you click on the button, a list of the available formats will be shown; simply click on the one you want and the appropriate label will be printed from your label printer. Don't forget to set up your label printer first! See the 10.08. Label printing preferences page for details.
You can also have box labels printed automatically from an A4 paper printer: this is an example of such a box label:

Documents tab
The Documents tab on a customer invoice enables you to save documents and other files relating to the invoice. The tab looks like this:

The table shows you all the files currently uploaded to this invoice.
- Upload document button: Click this to upload a document to the invoice. This will open a window enabling you to search for and select the file on your computer. After you've selected it, click on the Open button to upload it. If you upload a file with the same name as one already uploaded, mSupply will upload it as a new version of the already uploaded file.
- Delete document button: Select a file in the table by clicking on it and click this butotn to remove it from the invoice.
- Download document button: When you click on this button you are presented with two options:
- Download: this will download the file to a location you select on your computer.
- Download and open: this will download the file to a location you select on your computer and then attempt to open it using the default application on your computer for that file type. If there is no application associated with the file type on your computer then mSupply will tell you that the file could not be opened.
Log tab
Added: version 3.1
The log tab displays changes to the invoice that have been logged. Details of all logged activities are record in the mSupply Log.
MoneyWorks tab
If you are using the Moneyworks accounting software then the link between mSupply and Moneyworks will need to be enabled in File>Preferences>Moneyworks - refer General Preferences - Moneyworks. If this option has not been enabled, then the Moneyworks tab will not be visible.
The Moneyworks tab will show the status of the invoices inside Moneyworks accounting software once mSupply has carried out an export.

Custom data tab
This tab shows the custom fields that have been set up for customer invoices (see the Custom fields section for details).
All custom data will be saved with the invoice (i.e. when you click the OK or OK & Next button).
Adding lines to an invoice
Clicking New line will bring up the Add Item… window:

Finding the item you want
The first thing to enter is the Item Name or Item Code in the Item field. Type as much of the Item Name as you know, then press Tab. mSupply searches for all Items whose Name or Code starts with the text you have typed.
By default Items with a Code starting with a tilde (~) are not shown. This is a great way preventing a user selecting an item that shouldn't be used when it can't be deleted or hidden in a store - put a tilde character at the beginning of its code.
If no entries match the request, the Item field will read 'try again'. You can try as many times as you like! If you conclude that the Item you want does not exist in your system, click New item to add the Item.
Caution should be exercised before adding a new Item to your mSupply system. Duplicate items cause problems. Ensure that the item you are looking for does not already exist in your system and is hidden in the store you are logged into or is under a different Item Name and Item Code.
If only one Item matches your request, it will be chosen automatically and you will be returned to the Add item… window with that Item already selected.
If your mSupply system has been set up with unique Item Codes for each Item, then the experienced user will find that typing in the full Item Code here will save mouse clicks and/or key presses.
If more than one Item matches your request, all of them will be displayed.

Note: if the Show item unit column when issuing store preference is turned on (see the 25.08. Virtual stores page for details) then an Item unit column will also be included in the table.
If the wanted Item is visible, double-click on it or click on it once and then click Use.
If the wanted Item is not visible, click Cancel to try again to find it.
Selecting from stock lines
Once the item you want has been selected, the Add item… window will display a list of available stock lines (if any). Each stock line may be a different pack size, batch, expiry, or price. The stock lines are sorted by expiry date; first expiry at the top.

By default, the lines are numbered in the left hand column and sorted according to these values, in this order:
- Expiry date (earliest expiry date at the top i.e. in FEFO order; First Expiry, First Out)
- Then, for all stock lines with identical expiry date, by location priority (lowest priority number first; see the 4.06. Stock locations and location types page for details).
- Then, for all stock lines with identical expiry dates, in locations with identical location priority, by Location code in ascending alphabetical order.
- Then, for all stock lines with identical expiry dates, in locations with identical location priority, in locations with the same code (including the same location!) by batch number (ascending alphabetically).
- Then, for all stock lines with identical expiry dates, in locations with identical priority and code and with identical batch numbers, the number of available packs (in ascending numerical order i.e. smaller quantities first).
This sort order will be slightly different if the Sort available batches by VVM status rather than Expiry store preference is turned on (see the 26.07. Virtual stores page for details):
- VVM status (lowest first)
- Then by expiry date
- Then by location priority
- Then by location code
The first line in the table is selected by default but you can choose another line in one of three ways:
- Type the line number into the Line field and press Tab. The cursor moves to the Quan field.
- Double-click on the line in the list. That line number is displayed in the Line field and the cursor moves to the Quan field.
- Single-click on the line in the list. Clicking again in the Issue column will allow you to directly edit the issue amount in the list - see following.
Once you have chosen your line, the number of packs available will be shown to the right of the Quan field, the Pack size will be shown in the Pack field, and the total quantity to be issued will be shown below the list of lines.
In the Quan field, you can enter any number greater than zero.
If you want to enter directions or notes for customer invoice lines (that will be printed after each line when you print it out) then you can turn these on in the preferences. See the 16.03. Invoice preferences page for details.
If you need to see the full details of the item itself, click on the down arrow icon ![]() to the right of the item name field and you will be taken to the item's details window.
to the right of the item name field and you will be taken to the item's details window.
The number entered in the Quan field is the number of packs. The pack size of the currently selected line will be used to calculate the total quantity of units issued - which is shown below the list of lines as Total quantity issued.
Vaccines
If an item is designated as a vaccine (see the Is a vaccine and Doses fields on the 4.01.01. Items - General tab page for details of how this is done) then an additional Doses field is displayed on this window:

When you enter a figure in the Quan field the equivalent number of doses is automatically entered in the Doses field.
This works the other way round too, so you can enter the number of doses in the Doses field and mSupply will put the equivalent number of packs in the Quan field. This is useful because some users will think in terms of doses and others in terms of packs.
If the preference to display the Total field is turned on (The Allow users to enter total quantities to distribute preference, see the 26.07. Virtual stores page for more details) then this also works for the Total field: if a figure is entered in either the Quan, Total or Doses field then mSupply will put the correct equivalent figure in the other two fields.
Custom data fields for invoice lines
If you have entered any custom data fields for the trans_line table (see the 16.11. Custom fields page for details) then, when you have selected the item, the stock lines will appear on a Select stock tab like this:

and the Custom data tab will display the trans_line custom data fields you created in the preferences like this:

These custom data fields are all enterable and you can enter values as required. If you come back to this window when editing customer invoice lines later, the custom data fields will also be available for editing.
Issuing from a single line
If the number entered in the Quan field is less than or equal to the number available for the selected line, then that value will be shown in the Issue column in the list.
Click OK to return to the main invoice screen, or OK & Next to add another Item.
Please note: If the Allow editing selling price on customer invoice lines store preference is turned on (see Virtual store preferences) and the Price editable when issuing checkbox on the General tab of an item's details page (see Item basics - General tab) is turned on then there will be an extra Sell price field for the user to enter the desired selling price for this customer invoice line:

Issuing from multiple lines
If the amount to be issued is greater than what the top line can issue, then you can issue from multiple lines without leaving the window. There is an automatic and a manual way of doing this.
Manually issuing from multiple lines
For each item line that stock is to be issued from:
- Click once on the list to select the line
- Click again in the Issue column
- Enter / edit the issue amount in the Issue column
The Tab / Shift-Tab keys move the focus up and down the Issue column.
The Total quantity issued is updated at the bottom of the Add Item… window.
Automatically issuing from multiple lines
If the amount to be issued is greater than what the top line can issue, mSupply can automatically select stock from multiple lines on a FEFO basis. To allow mSupply to do this, simply enter the total quantity you wish to issue into the Quan field.

If the quantity typed in the Quan field is more than there is available for the selected line, and the Tab key is pressed to leave the Quan field, this message is displayed:

If you accidentally entered more than you intended, click Try again, otherwise click the Distribute button.
Issuing when there is not enough stock
If the amount to be issued is greater than the total stock available from all of the available lines, then a placeholder line may be used, if your mSupply preferences allow.
Placeholder lines
If there are no lines available, or none of the lines are suitable (for example, this order needed strip packaged stock, and the available lines are all bulk packs), then you can add a placeholder line that will record the desired quantity and pack size until either you get stock, or go to confirm the order, at which time the item will be either moved to backorder or deleted (depending on how you have set your Preferences).
A Placeholder line can be added manually or automatically.
Manually adding a placeholder line
A Placeholder line can be added by clicking the Add Place holder button.
As shown in the window displayed below, placeholder lines are coloured in red and have a batch of “none” so you can easily identify them.

The quantity to be issued in the placeholder line is entered in the same way as any other Item Line - refer Manually issuing from multiple lines
Automatically adding a placeholder line
If the number entered in the Quan field is greater than the total stock available from all of the available lines, then mSupply will prompt you with an Alert:

After clicking OK, all existing stock lines will have the Issue column populated with the total quantity available for each line, and a placeholder line will be created with the outstanding quantity inserted in the Issue column.
If you have allowed placeholder lines in the Preferences, and you choose an item that has no available stock, a placeholder line will be created automatically.
Confirming an invoice with placeholder lines
When confirming an invoice that has placeholder lines, the following actions will occur:
- If you have activated backorders, a backorder line will be created for each placeholder line.
- If you have set the Preferences to delete placeholder lines when confirming, they will be deleted, otherwise they will remain on the invoice to show the client that their order was received, but the goods were not supplied.
Issuing all available stock of a batch
Sometimes you might end up with an unusual available amount of a particular batch. Due to the fact that mSupply rounds the available quantity, it may be hard to enter the exact amount to completely issue the batch. In such situations you can issue the total amount available by holding down the shift key while you double-click a line. This will issue the total available amount of that batch.
Lines on hold
Sometimes you will see that a stock line has a tick in the tick-box in the Hold column and the line cannot be selected for issue, like the bottom one in this screenshot:

There are two possible reasons for this:
- The stock line itself is On Hold - see the Editing a stock line section for details.
- The location is On Hold - see the Locations and location types, Adding a location, General tab section.
You can find out whether it is the stock line or location (or both!) that is On Hold by double clicking on the line in question. If it is the location that is on hold then, in the window that has opened, the Hold checkbox on the General tab will not be checked. If the item line itself is on hold then it will be checked.
If there is insufficient stock in 'off-hold' stock lines to fulfill the invoice, a placeholder line can be created.
Adding lines from a bill of materials
Added: version 3.72
If the “Show 'Add from BoM' button” preference is turned on (see here for details) there will be an additional Add from BoM button on the customer invoice form:

When you click this button it shows you a list of all the Bills of Material that exist in mSupply. Select one of those then mSupply will add all the items on that bill of materials (with the quantities they have on the bill of materials) onto the customer invoice as placeholder lines. You can then assign stock to the placeholder lines in the normal way (see, for example, Editing a placeholder line on an invoice below).
See the Bill of materials section for details about creating and using bills of material.
Editing an invoice line
To edit an invoice line, double-click on it. You will be presented with the Edit line window, which is identical to the New line… window, except that the item name is already chosen.
In the Edit line window the quantity you have already chosen is added back into the Available stock column. You are viewing the stock records as if the line has not yet been processed.
Similarly, any other invoice lines for the same item are also shown in the same way; the Issue column is filled out with the the amount being issued from each batch on the invoice and the Available column includes the Issue amount.
For example, in the window below, there are two lines on the invoice for different batches of paracetamol, and all are shown when editing, irrespective of which of the lines was double-clicked.
At this stage you can:
- Edit the Issue value for the selected line item, or change the value in the Quan field
- Select a different item line (that is, a different batch) and edit it's Quan or Issue value.
- Click in the item name field, and select an entirely different item!
Selecting a different item has the following effects
- If you proceed to issue the new item, all invoice lines for the item you were editing will be deleted, and invoice lines will be added for batches being issued of the new item.
- If you choose a new item for which there is already one or more lines on the invoice, the stock to be issued on those lines will be shown in the “issue” column. If you proceed you are effectively editing the quantities of the item you have just selected, and you are deleting all invoices lines of the item that was originally on the invoice.
PLEASE NOTE: If the customer invoice is confirmed then you will not be allowed to issue from stock lines that were received after the customer invoice's confirm date. This condition can only be possible if the Allow confirm date to be edited on invoices preference (see the 15.03. Invoice preferences page for details) is, or has been, turned on.
Changing the batch to be issued
If you want to choose a different batch for an existing invoice line:
- double-click the invoice line
- set the quantity of the batch you don't want to zero,
- double-click the batch you do want, and enter the quantity you want to issue.
- Note that if possible the new batch will be added to the invoice at the bottom of the other lines, and the former invoice line will be deleted. You can use drag and drop to reorder invoice lines if this is a problem.
Editing a placeholder line on an invoice
When you double-click a placeholder line, an extra button is displayed:
The Redistribute all button takes the quantity on placeholder lines and re-assigns it to actual batches in stock, assigning stock from stock lines in the order described in the Selecting from stock lines section above.
When you are not editing a placeholder line, the button is not visible.
Invoice line custom data
If you have custom data fields created for the trans_line table in the preferences then the custom data tab will be visible and you can also edit the custom data field values. See the Custom data fields for invoice lines section above for more information.
Reordering invoice lines
Invoice lines can also be reordered by drag-and-drop of a line to a new location. This can be useful to group lines for the same item.
If the invoice lines are currently sorted by line number, the renumbering will happen, otherwise you will be shown an alert message.
If you really want to reorder lines when sorted by a different column, hold down the shift key as you drag-and-drop to override the message.
Note that reordering can not be undone, apart from you manually dragging lines back to their original location.
- Lines in most mSupply forms can be sorted according to any column by clicking on the heading of the column that you want to sort by.
- To make any sort order 'stick' when it is printed, you will need to renumber the lines - refer Issuing Goods to a Customer (Customer Invoices), The Grinder button above.
- A common desired sort order for a pick slip is to sort lines by Location, so that when a pick slip is printed, the picker can work their way through the store systematically by Location. In fact, this is such a popular feature, we have set a printing preference so that it will happen automatically without needing to manually sort the list - refer Printing Preferences
 .
.
Currency settings
If you have customers that use a currency other than your own, mSupply can be configured to use your customer's own currency. Firstly you need to make a selection in the Store's preferences to enable issuing in a foreign currency.

Once you have done this, you can select a currency for a customer from the edit customer window.

You can also select the customer's currency when entering an invoice.

Currency: This is the currency your customer uses. It is set in the Customer Details window of the Customer record and is displayed when you add your customer's name to the invoice.
Currency rate: Gives the exchange rate stored in mSupply.
Foreign currency total: Provides the invoice total in the currency the customer uses.
Printing an invoice: picking slips and delivery notes
You can print an invoice at any time when it is open in two ways:
- by checking the print icon checkbox (next to the OK button) and clicking the OK button:
- by holding down the Shift key on the keyboard and clicking the print icon instead of checking it.

Method 1 will close the invoice after printing, method 2 will leave it open after printing.
But note: you print different things depending on what status the invoice has:
- If the invoice is suggested (sg) then a picking slip is printed.
- If the invoice is confirmed (cn) or finalised (fn) then a customer invoice or delivery note is printed.
Whether you use method 1 or 2, you are shown the print options window:

Form to use
The Form to use drop down list contains all the options for the format of the print out you will get. All the standard mSupply options will be here, as well as any custom forms we have created for you.
If the form you selected to use wasn't the one offered by default and you want to set it to be the default from now on (beware, this will set it for everyone!) then check the Remember this choice checkbox before you click on the OK button.
Dispatch labels
If you want to print dispatch labels to go on each box then check the Print dispatch labels checkbox. This will print labels on 100x150mm labels on a label printer, not the usual A4 paper printer you print the picking slips and delivery notes with so you must have configured that in mSupply first - see Printing preferences (setup) for details on how to do this. If you only want to print the dispatch labels and not a delivery note then select the None option in the Form to use drop down list.
Print destination
The print Destination options:
- Printer: the invoice will be printed out straight away.
- Preview: a preview of what the invoice will look like when it is printed will be displayed in your installed PDF file reader. You might be able to print the invoice from the PDF reader, depending on its features.
- PDF file on disk: the invoice will be saved to disk in PDF format.
- Email PDF: the invoice will be created as a PDF file and attached to an email for you to send. You can double-click the email attachment to see a preview of the invoice. The email preferences in File > Preferences should be setup correctly before using this feature.
- Export to Excel: the invoice will be exported as a spreadsheet file and opened for you (provided you have a spreadsheet application installed).
Recommended process
The recommended process for distributing your goods is this:
- Create the customer invoice (new or suggested status).
- Print the picking slip and give it to the staff who will pick the goods off the shelves.
- As the goods are picked, note down any discrepancies between what was actually picked and what was on the picking slip.
- When the pick is complete, enter any changes into the customer invoice in mSupply (Note that inventory adjustments or location adjustments of stock may be needed to correct issues found by the pickers). This step is very important to make sure your stock remains accurate in mSupply.
- Confirm the customer invoice when it matches exactly what was picked.
- Print the invoice again - this time a delivery note is printed.
- Send off your goods with the delivery note!
A note about picking order on picking slips
You can print picking slips by item name in alphabetical order (the default) or, if this does not match the way goods are stored in your warehouse, you can change the order to make the top-to-bottom picking order more efficient. Use location priority (see Locations and location types) and the printing preferences (see Printing preferences) to achieve almost any order you want to match the most efficient way of picking in your warehouse.
Entering a service line on an invoice
All “normal” customer invoice lines represent the issue of stock lines to a customer. (These lines appear in the large section in the middle of the “Customer invoice” window).
mSupply also allows you to charge a customer for “service” item(s) such as freight, or advice or a refundable deposit on a cool box.
Enter the description and amount at any time until the invoice is finalised.
Note: the “subtotal” amount on the invoice includes any service charges, and tax (if any) will be added to the amount you enter.
Editing tax on invoices
The tax rate on an invoice is determined by the “default tax rate” setting in the mSupply Preferences.
To edit the tax rate on an invoice, click on the tax rate box at the bottom of the invoice entry window. You will be asked to enter a new percentage tax rate. Click the cancel button if you do not want to change the tax rate.
Note: you can not change the tax rate on finalised invoices.
Confirm and Finalise the Customer Invoice
- Confirming the Customer Invoice changes its status to
cnand takes the stock lines out of stock. - Finalising the Customer Invoice changes its status to
fnand prevents any further editing of the invoice. It makes no further change to the level of stock in your store.

If the customer is a store in your mSupply system then:
- You MUST finalise the customer invoice for the stock to be transferred to the receiving store and for the receiving store to be able to process receipt of the stock. mSupply will prompt you for this when you click OK on a customer invoice with status =
cn. - Finalising the customer invoice in your store will result in creation of a Supplier Invoice in the receiving (ordering) store.
Receiving returns of goods on Customer Invoices
If a customer returns goods that are on a customer invoice, once it has been finalised you can receive those goods back into stock directly from the customer invoice. To find out the details of this process, please see the 9.02. Receiving goods back from a customer page.
| Previous: 8. Issuing Goods | | Next: 8.02. Viewing customer invoices |