8.02. Viewing customer invoices
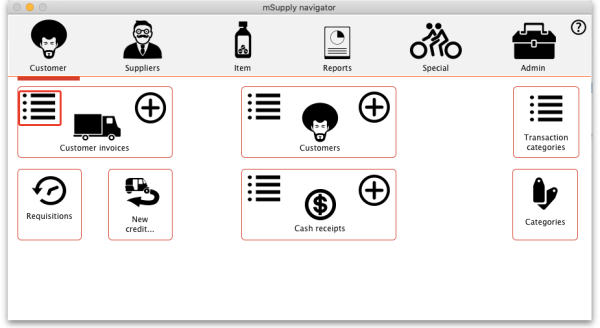
To view or edit any customer invoice, choose Customer > Show invoices from the menus or click on the Show me a list icon in the Customer invoices section on the Customer tab of the Navigator:
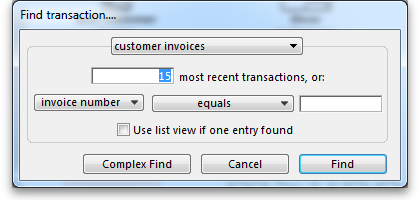
Find transactions window
You will be presented with this window:
If you just press Enter, that is the same as clicking on the OK button, and it will display a list of the 15 most recent invoices.
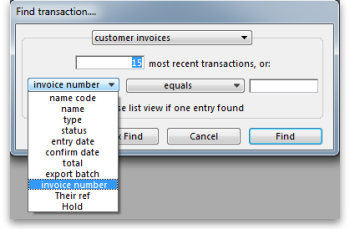
Click on the drop down list on the left to display the options available for determining which field to query:
Choose the comparison from the next drop down list (equals, starts with etc.)
The comparison popup menu will change depending on the type of field you have chosen in the first list.
Enter any values that you want to query against in the field at the bottom right.
Some examples:
| If you.. | Transaction(s) Displayed |
|---|---|
Type 1 and press Enter | You will be taken directly to the most recent invoice entered |
Type 25 and press Enter | A list of the 25 most recent invoices |
In the lower, right field, type 123 | Invoice number 123 will be displayed. |
| Click on the invoice number dropdown button and select one of the other search filters (e.g. Name) Click on the equals dropdown button and change it to, say Starts with Type the first few letters of the name of a customer, e.g. maj and press Enter | A list of all customer invoices to customers whose names start with maj (this is not case sensitive) |
This window is very useful for quickly finding a group of invoices. If you'd like the challenge of engaging with mSupply's data structure, you can query on multiple criteria. Click on the Complex Find button, which takes you to the Query Editor, which has powerful features to perform queries with multiple conditions. Detailed guidelines for using the Query Editor are to be found in Working with lists
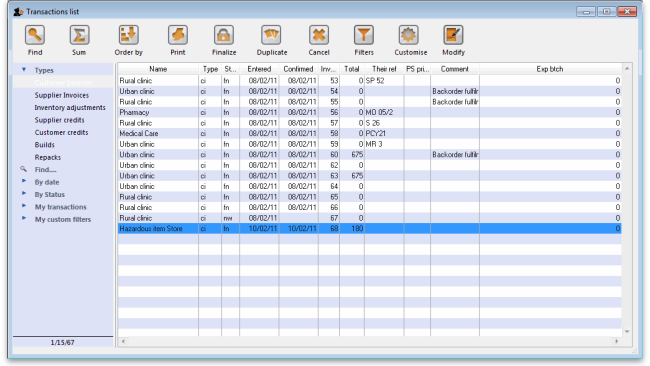
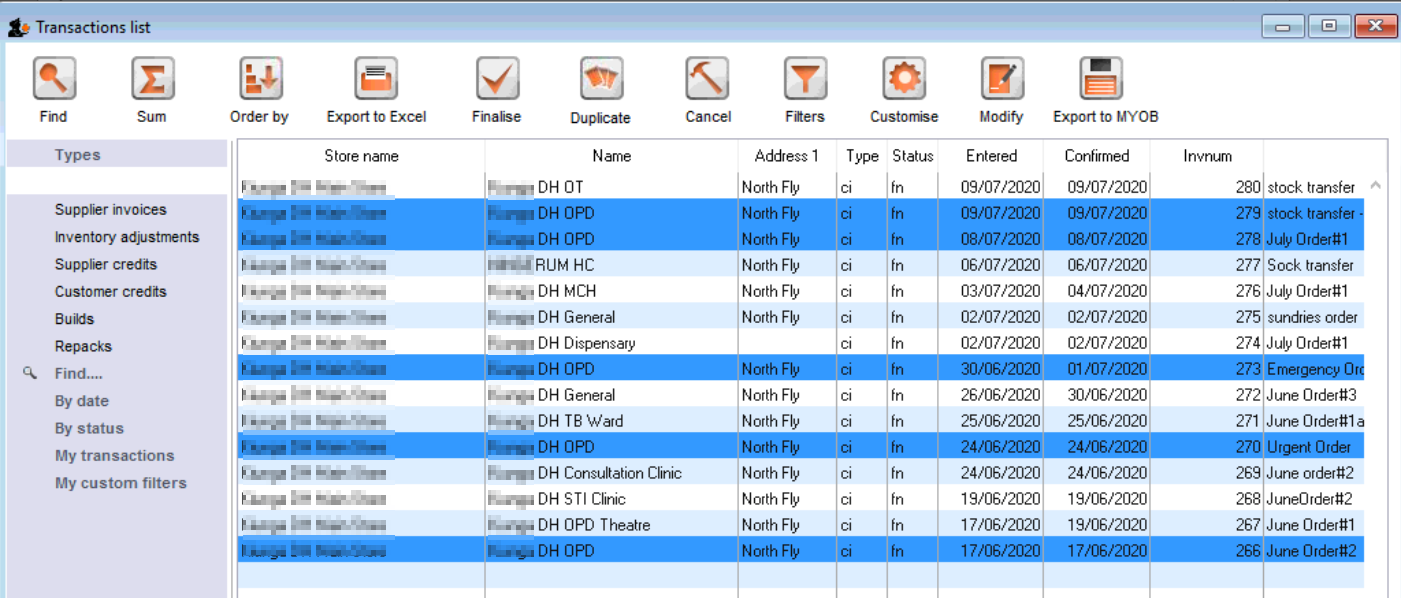
The list invoices window uses the Transactions list window, which looks like this:
Note. All of the columns may be adjusted in width to meet your requirements; for the screenshot above to fit on the page, most of the columns were reduced in width.
Dynamic filter
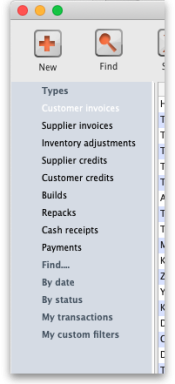
Down the left side is a sidebar, with 6 headings:
- Types
- Find…
- By date
- By status
- My transactions
- My custom filters.
You can click on them and some of them will expand to show sub-headings (and contract to show just the heading if you click them again). This is what the bar looks like when it is first shown, with the Types heading expanded and all the others contracted:
The Find… option does not expand but shows the Find Transactions window again when clicked.
Once the type of transaction has been selected, it remains selected while you further refine the required criterion from one of the four remaining headings, By date, By status etc. Be aware that a single criterion only from this group of 4 headings may be selected.
At the bottom left of the window you'll notice there are 3 numbers separated by slashes, “1/15/67” in the example above. These numbers, in order, are the number of highlighted rows, the number of found rows, and the total number of transactions in the database.
Selecting multiple tansactions
Once you have a list which includes the transactions you are interested in, you may wish to carry out certain actions (described below) on more than one of them. To do this, control-click (command-click on Mac) the lines you wish to highlight.
Buttons
Find
Click on this button to bring up the Find Transactions window again.
Sum
Click on this button to display the total value of the highlighted invoices. Highlight more than one invoice by control - clicking (Mac: command-clicking) invoices. Highlight a block of invoices by clicking on the first invoice of the series, then shift-clicking on the last invoice in the series.
Order by
The invoices displayed may be sorted according to any of the columns by clicking the column heading. A more comprehensive sort facility is available when you click the Order by button. This displays the order by window, where you can drag fields from the list on the left to the right-hand pane to sort the list by the fields you have chosen.
Click on this button to print the list of invoices displayed. This does not print the actual invoices, just a list of them.
Finalise
Only users with Finalise permission will be able to do this action. Click on this button to change the status of the invoice to finalised.
mSupply also has a Bulk Finalise feature
We can bulk finalise normal invoices; however, this functionality is not available for invoices related to stock transfers. To finalize “stock transfer” invoices, you must open each specific invoice and finalize it individually. As stock transfer involves distributing physical stock to your client stores, this action cannot be un-done easily. Hence mSupply will expect you to finalise the invoice after careful consideration.
When performing a bulk finalise, all selected normal invoices will be finalised. However, the following types of invoices will not be finalised:
- Stock transfer invoices. (read above)
- Invoices that are on hold.
- Invoices that are not confirmed.
- Invoices containing only placeholder lines.
Duplicate
Click on this button to duplicate the transaction. You would use this feature, for example, to supply exactly the same items to another customer. You will be asked if you want to duplicate all lines on the invoice, or just the placeholder lines.
If the invoice was part of the internal requisition process (from one virtual store to another) then the links to the originating purchase order will be maintained, and a goods receipt will be created if you finalise the customer invoice at a later date.
Please note: you are not allowed to duplicate some transactions such as payments, cash receipts and any type of cancellation transaction (an “inverse” transaction created to cancel another).
Cancel
Click on this button to cancel the highlighted transaction 1). This command only works on finalised invoices. The invoice is not deleted from the system; mSupply makes a duplicate finalised invoice with the same invoice number but with negative quantities matching those on the invoice you're cancelling. This ensures that all transactions are preserved and will appear in an audit trail. But note that you will not be able to cancel a finalised customer invoice which put stock into mSupply and some of that stock has been used. An exception to this is a stock transfer: if none of the transferred stock has been issued then the original finalised customer invoice which initiated the transfer can be cancelled if the supplier invoice produced from it is first deleted.
If you have accidentally finalised a transaction you can use the cancel and duplicate buttons to
- Highlight the finalised invoice and click Cancel
- Hightight the finalised invoice again and click Duplicate to duplicate the original transaction
- You can then edit the duplicated transaction to the correct values before finalising it again.
Filters
Click on this button to apply filters to reduce the volume of information displayed to reflect more precisely what you require.
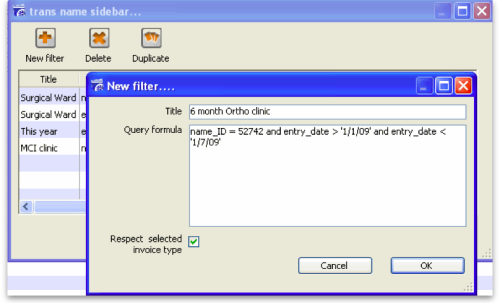
Take as an example, a hospital where you have searched on a large number of customer invoices, but you are really only interested in issues to the Orthopaedic Clinic during the first six months of a year.
Clicking on the New Filter icon presents you with a window where you can define the criteria for your filter, in our case the customer's ID is entered, and the period under review - i,e, January to June 2009 using the syntax of a WHERE clause in SQL
The Respect selected invoice type checkbox has the effect of applying the filter to the type of invoice which has been selected in the sidebar, and if we do this in our example, instead of displaying several hundred invoices, only the handful of invoices for the Orthopaedic clinic will be shown.
Any filters so created are listed under My custom filters , and are available for use as required until they are deleted.
Customise
This button allows you to change the columns of information that appear for you when this window is displayed in future. Please note that this same window is used to display a list of different types of transactions, not just customer invoices.
The button also allows you to change the order the columns appear in the list.
Display the information you require
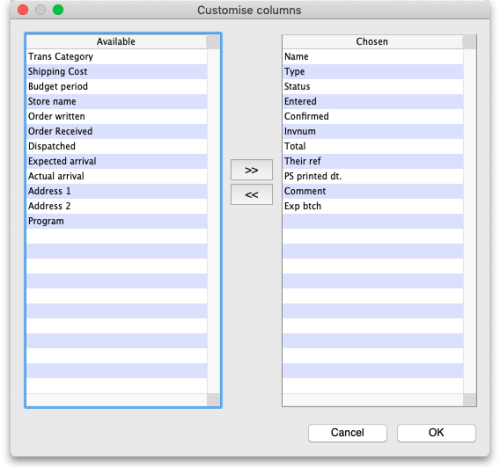
When you click on the Customise button this window opens:
Displayed under Available on the left are the available fields (these columns are all hidden), while displayed under Chosen on the right are the presently selected fields (these are the ones that are displayed).
To add a column to the display, click on the required one to select it in the Available column, then click the upper button between the two displays, and it will appear at the bottom of the Chosen list.
The Program column (shown in the Available table in the above screenshot) will show which customer invoices belong to which programs (obviously, the column will be empty if the customer invoice doesn't belong to a program because it was not created from a program based requisition).
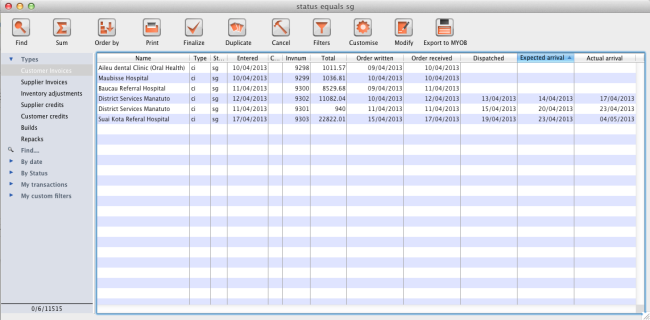
mSupply provides the feature of analyzing customer invoices by their despatch/delivery/arrival dates. Once a customer invoice has delivery dates entered for it, Transport details, choose the customer delivery columns 'Order written', 'order received', 'dispatched', 'expected arrival', 'actual arrival' to be included in your transaction list:
This list shows customer invoices in mSupply ordered by Expected Arrival Date. Click on the column header to order on that column (as with nearly any column in mSupply).
Arranging column order
This is done by clicking then dragging the column heading to the required position in the Chosen table. The highter it is in the table, the further left it appears in the transactions list window.
Sorting the list
Click a column heading to select it, then click on the small triangle on the right to display the list in order or reverse order as required. This is the same for nearly all column headers throughout mSupply.
Modify
Click on this button to edit the selected invoice. This is the same as double-clicking the invoice.
Export to MYOB
Click on this button to export the selected invoices to the MYOB software - refer to Exporting to MYOB.
| Previous: 8.01. Issuing goods to a customer (customer invoices) | | Next: 8.03. Backorders |
